cookieChoices = {}
Image Map
Showing posts with label Hairstyle. Show all posts

Sunday, 27 April 2014

How To: Hair Inspiration from Bride of the Century-- Na Doo Rim's Hair (Yang Jin Sung)

Hello everyone!
It has been a while since I did an individual post. So today I've got 2 hair tutorials for you!

Recently, I've been watching this Korean drama called Bride of the Century and I've been seriously loving the hair that they do on the main female lead (Na Doo Rim)! Maybe it's because her hair length and style is pretty similar to mine, so I really appreciate that I can get some hairstyle inspiration from her.

One of the things I've been noticing is the way her fringe is pinned up. It's a casual pin back look but there's a lot of thought put into it. I decided to share with you all here if you've not watched the show because the way it's done really helps shape the face!It's a great style for those of you who're in the awkward phase of growing the fringe out. I've also included in a tutorial on how to do the fancy braided fringe look because one can never have too many ways to style the fringe. So if you're in the process of growing out your fringe or you want to change the look of your bob, this post is for you!

The Casual Pin-Back Look

Here's the first look. It's a simple pin back but it's to the side. Notice that not all the fringe is pinned but a few strands of hair is left such that they drape diagonally across the face to shape the face. This is much more flattering than taking the whole bunch of fringe and pinning it (unless your face suits it). It's a super practical and good way of getting annoying fringe out of your eyes and look nice too :)
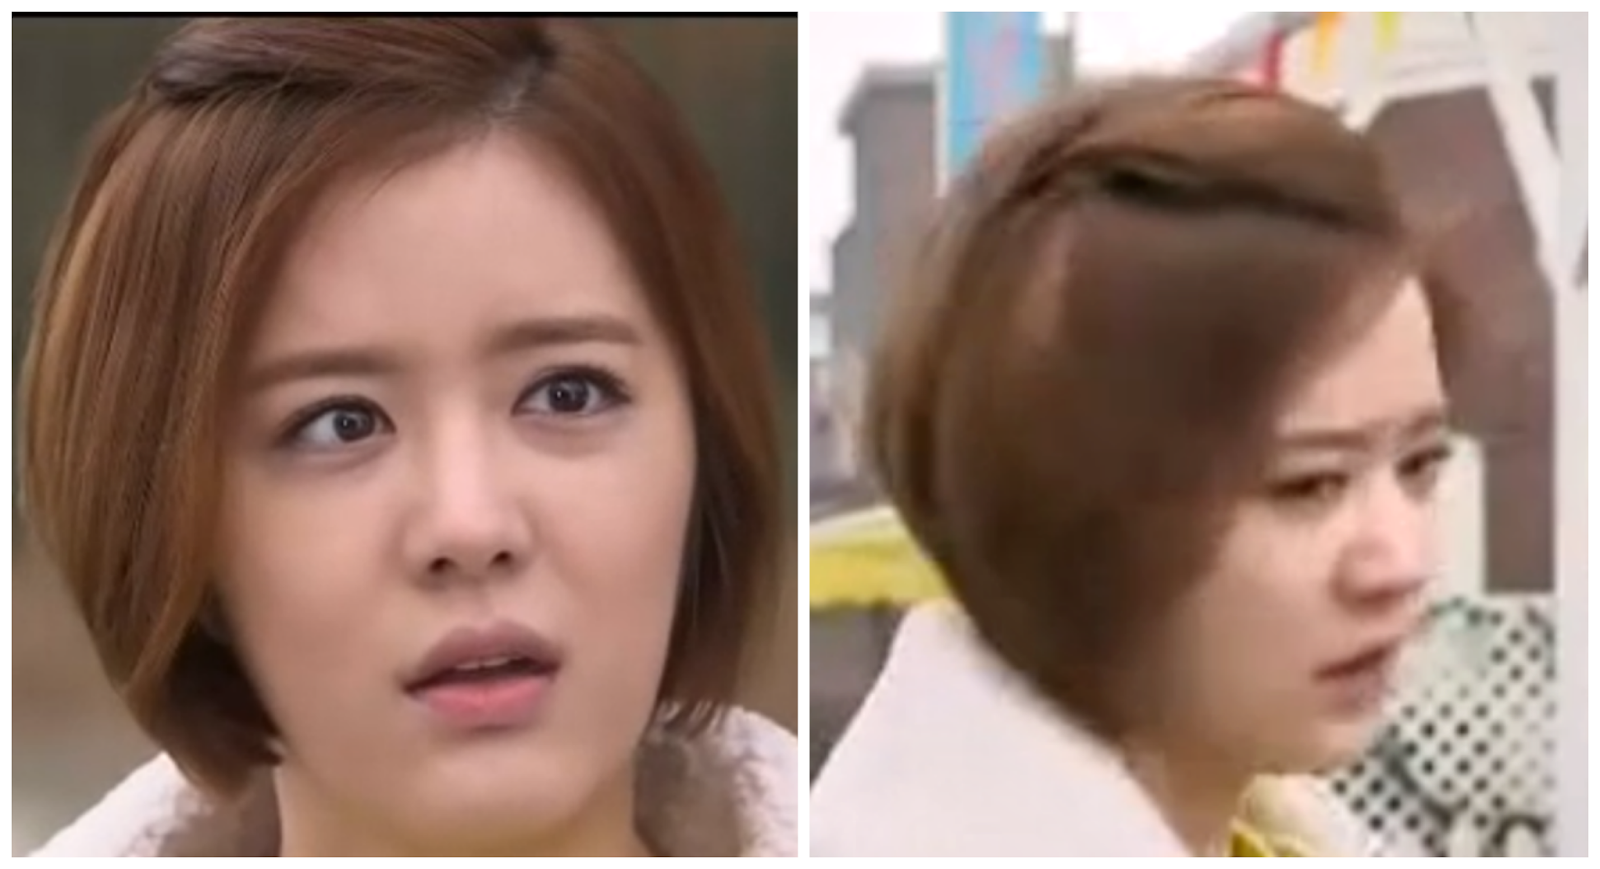
Photo: Screengrab from Bride of the Century drama
Also, the hair is not flatly pinned to the head. The person made it puffy by twisting the ends so the head doesn't appear flat (Look at picture on the right).

So what's different in these 2 pictures? 
The first picture is a depiction of the way I often see people pin their fringe up. It's not very flattering for people whose forehead is squarish like mine because it emphasizes on the broadness of the head, thus making your face look bigger.

The second picture is a depiction of the way Na Doo Rim's hair was done-- it has a pretty deep side parting, in the 8:2 or 9: 1 ratio. the longer fringe is let down to cover the side of the forehead so it's more flattering on the face. Overall it looks better no? If you're interested in how to replicate the style, keep scrolling ^.^

Steps:
1 &2: Create a side parting in the ratio of 9:1 or 8:2, depending on how wide your forehead is and how much of your fringe you want to leave out. Here, I have done a pretty extreme parting because I was feeling like it.
3: Grab a small section of the fringe to pin up, around 3-4 cm wide a section. Basically just take up the part of the fringe that falls over your eyes.
4: Grab some hair from other parts of your head along the axis of your parting. Just the top layer of hair will do. Pull the fringe slightly towards the back of your head and give it a tiny twist.
5: Hold the twist and push it towards the top of the head slightly to create a tiny puff( because you don't want your head looking flat!).Pin it using bobby pins or use a claw clip like me.
6: And there you go! A simple and easy way to deal with that annoying fringe you're growing out and still look good :)

The Fancy Braid Look

Here's another look that I adore. The fringe has been incorporated into a french braid that starts at the crown and hair is taken in on both sides of the braid.This is like an upgrade from the simple fringe done in look 1.

From what I could tell in the video, only the fringe at the peak of the forehead is taken in the braid. The rest of the hair is left to shape the face like the first look. The first section of the braid takes in hair from both sides. After all the fringe that is wanted to be braided is incorporated in the braid, then the rest of the braid becomes a lace braid where only the hair from the back is incorporated in the braid. The stylist ended the braid slightly after her ear and pins it and covers the pins with the rest of the hair.

Photo: Screengrab from Bride of the Century drama

Here's my take on it:


Steps:
1: Choose your side parting as you did in the first look.
Do this step if you want a neat line (if not, go to step 4):
2: Segment your hair as shown. Basically take a comb and separate the part of your hair from behind you ears and tie that section so you can get a straight line as seen in the photo. This is the part which you do not want to incorporate into the braid. Use a clip or hair tie to secure.
3: From the fringe area, pin away the fringe that you do not want to incorporate into the braid.
4: Now let's start braiding! Take a small section of the fringe that you want to braid along with some other hair from the rest of the free hair and divide into 3 sections. Do a dutch braid by taking the some hair from the left side of the braid and add it to the leftmost section and then crossing it under the middle section.Do the same for the right side of the braid.
5: Keep repeating step 4 until you have incorporated all the fringe that you want to braid in the braid as shown.
6: From this point, do a lace braid. Only take in hair from the back part of the hair to incorporate into the braid. Do this until you reach the edge of your head.
7: Now, braid the rest of the remaining hair normally for a few more centimeters.
8: Secure with bobby pins behind your ear.
9: Remove the hair tie and clip and arrange your hair properly and ....you're done! Good job getting this far!

Get creative by adding hair accessories!

Holographic Flower Pins: H&M
I got these at $2 on sale a few months ago. There's a black version too but the white is prettier :)
For those of you who feel like you're pro or is too lazy to section your hair, it'll still look as good! Here, I've included a photo of my hair when I did it by feel (Picture 1) and a photo of my hair when I did it with proper sectioning(Picture 2). You can see that in Picture 1 that I took in hair from a wider area of my head.

Well I hope you've enjoyed this hair inspiration + tutorial post! I think this look is great for everyday wear or if you want to feel special. With it being wedding season, I think this hairstyle is great for attending outdoor weddings! This hairstyle goes great with curls/waves but I think it'll also work well with straight hair :) I think one of the important things about these 2 looks is knowing where to stop the parting at and how much fringe to pin up. You'll only know this by trial and error because each person's forehead and face shape differs. If you've liked this post, check out an earlier how to guide on crown braid here. It's a super easy and chic look!

That's the end of today's post! Have you watched Bride of the Century before? I feel sad that the drama is so short compared to other korean drama series. I really enjoyed this drama alot, even with all the cliched korean drama scenes. If you've not watched it, you can watch it on Dailymotion (or google Maplestage or Tiveee.com for Chinese and English subtitled versions respectively).

Till next time!
Love,
El   xoxo


Saturday, 15 March 2014

How To: Crown Braid

Hello everyone! 

Today I have a quick post on how to do a crown braid! The crown braid has been catching alot of my attention lately, having seen it in pictures of runways, red carpets and on tv! It's also a super easy hairstyle to do for spring. To make things easier, I've made a quick image guide. If you need more detailed instructions, scroll down for more words.

1: Divide hair into 2 sections
2: Braid each side. Just a basic 3 strand braid and pancake the braid (make braid look thicker by loosening it slightly) If you're a pro or has lots of time, do a 4 strand/5 strand braid if you want!
3:Take one braid and pull it to the other side of your head. In other words, take the left braid and pin it on the right side of your head and vice versa. Pin it with 1-2 pins. I like to use 2 because this will hold the braid in place better.
4: Take the other braid and do the same. Try to hide the bobby pins by tucking your hair over them.
5: Tuck the fringe into the side of the braid if you've got a long fringe. pin it in with a bobby pin.
6: and you're done! You can switch it up by incorporating a scarf while braiding or adding floral hair accessories. For a messier/bohemian look, leave a few strands of hair hanging and curl them to frame your face.

Well I hope you've enjoyed this post! I would say this hairstyle is great for people with thin hair too (as seen from Christine).

Till next time
Love,
El

Sunday, 23 February 2014

El's Hair Update

Hello lovely people!

It's already Sunday. I can't believe it'll be Monday again so soon.

Here's the post about my hair that I promised way back in December. Sorry it took so long, because there were so many events in between that I wanted to write about first. Also, this post is quite long since I put in a slight review of the salon I went to. It was a good salon, hence I'm writing it in. If you're just interested in how my hair looks like, just scroll all the way down to the section titled 'Living with Curls'.

If you haven't noticed or realised, I've had my hair permed and coloured! This wonderful hairstyle of mine is thanks to Fion from 99 Percent Hair Studio@Haji Lane. I'm in my salon hopping phase still, so I visit different salons in search of THE salon for me. If you have read my previous hair post, I had  mentioned that I went to I*CON Shunji Matsuo by Lily Xu@ FEP to cut my hair short. The experience there was pretty good, but I'm always trying to find a better one(aka cheap and good). It's like my constant search for the holy grail of all foundation/skincare. If you're interested in 99 Percent Hair Studio, you can check out their Facebook page here.

99 Percent HS is not cheap in my opinion, but at least I'm really happy with my experience there. I spent around 6 hours there. 6 HOURS. That's like one of the longest time I've ever spent in a salon. Thus it was lucky that I had a good experience there. It was also nice that my friend came along as she wanted to get her hair coloured. Thus we had each other for entertainment, even though it did get boring at times.

Why a perm?
My hair is naturally wavy/frizzy. I go for rebonding every now and then to get my hair tamed. My mum prefers the silky straight hair look, so I've never really gone for a perm. However, I had this sudden epiphany one day. 'Won't a perm be better since my hair roots grow out curly/wavy?" I was also sick of flat, black hair. I became convinced that a perm will be better. It took some effort to convince my mum before she gave me the green light to go ahead.

I booked an appointment at 1pm (11 Dec) with the salon, but ended up reaching later. The salon was pretty busy. It's a small but cosy salon. It's located in Haji Lane itself, so if you're waiting for your hair colour to set in, you can always go out and shop for a while. Haha. I booked Fion since her skills are highly reviewed!

 Anyway, I told Fion that I wanted to perm my hair and maybe even colour it if possible. Usually, it is advised that people don't get colouring and perming/rebonding done in one sitting because that can seriously damage the hair. I was able to perm and colour at one go though, because Fion said my hair was strong enough. I told her how I wish for my hair to look like and she gave me a couple suggestions. We discussed for a while and she also showed me pictures of what to expect. Cool fact: she told me that if I coloured my hair and then perm, the perm solution will lighten up some parts of my hair, resulting in slight highlights! I thought this was pretty ingenious. After that, she gave me the colour book to pick a colour and left me. It was almost an hour till she got back to me (she had so many customers' hair to do!). It was such a long wait that me and my friend got bored talking to each other. Haha.  Thankfully, Fion returned! I was stuck between 2 shades of brown (yep. brown has more than one shade) but managed to pick one quickly.
This is kind of how my hair looked like before cutting. Black hair. Flat. Help.

We finally got down to the wash and cut phase. Whew. That was a long wait. The washing part was ok. It didn't hurt or anything. On a side note, the shampoo smells really gooooood. So with my hair washed, Fion got down to cutting my hair. The first thing she did impressed me. She didn't ask me where my parting was and got it right at first go! This might be insignificant to you, but a huge relief for me. Usually, I would get stressed when hairstylists ask me where's my parting, because I don't know it exactly myself. (I just figure it out somehow while drying my hair) As a result, I would end up with weird strands poking out when I do not get back to the same parting after the haircut. Thus imagine my relief that she got my parting right without asking me. It shows that she actually noticed where's my parting before she washed my hair. Or maybe she decided it on her own. Or maybe she just got lucky.

Moving on, this is how my hair looked like after it got cut:

a tiny picture of me from my chair. Hair's not looking that great yet.

After that, I got my hair coloured. I had to sit and wait for almost an hour for the colour to sink in.

My new hair colour! If you're wondering about the book, it's James Joyce's Dubliners, which is a good read:)

Next, the perm solution was applied to my hair and left to sit. I had to do digital perm, because of my rebonded hair. According to Fion, the cream that is used in rebonding can only be 'overwritten' by the solution used in digital perm because they're the same cream. Worst still, my hair is resistant to chemical treatments, so she had to leave the solution in a little longer.
Waiting for the perm solution to sink in... Here's a super unglam photo.


Next, she used a curling wand to curl my hair. I was surprised since I expected those rollers that you see in dramas. I had a slight shock seeing how tight the curls were initially. After Fion loosened the curls, they looked much better. A bit of styling cream and some fussing later, a beautiful head of curls is born.

And now I'm done! Yay!
So that's how my hair looked right after the salon visit. Honestly, I wasn't totally wowed by my hair initially. I really like the colour, but wasn't too sure about the curls.

The whole trip cost me around $289, after paying for membership and using the discounts that comes with it. Fion charged me lower than the listed price for colouring and perm as my hair was short. Anyway, I paid more than this when I went to get my rebonding done at Jean Yip with my long hair, so I saw it as paying for my yearly rebonding.(Jean Yip's silk rebonding is the only rebonding treatment that looked good and didn't dry the hair up like crazy).
However, the curls looked alot better loosened out a few washes later. My love for my hair grows each day. Plus, I've received many compliments for my hair (Yay!).

My hair a few washes later~ Can you tell that the curls have nicely loosened to look slightly more natural now?
Living with Curls
2 months later, I'm still in love with my hair. My roots has grown out somewhat, but I really like the curls. My hair has that nice swishy feeling when I shake my head. Having colour and perm done haven't seriously damaged my hair. My hair doesn't get tangled much and my ends are not dry(despite how it might look). I got the volume and lightweight look that I wanted. The bonus is that I wake up with pretty much amazing hair on most days. Who knew curls are so fuss free(for me at least)? To maintain my hair, I just do my usual routine of shampoo and deep conditioning every other day. I make sure to blow dry my scalp and the hair near the scalp, leaving the ends to air dry. The curls spring back after the hair's dry. On days when I really want to enhance the curls, I add a bit of mousse.

My hair after adding in some mousse. My curls are still not fully dry so it's not poofy yet. My hair gets curlier the next day.Bedhead+mousse=Curls galore
(Btw, this is me barefaced, aka no foundation. I love how clear my skin is right now. HAHA)

Caring Hair Expert Contour  Styling Mousse, It contains hair conditioner which helps keep my ends soft. I got this from a Watsons in Bangkok for 64baht (I think). I think this mousse is not bad. It doesn't give that 'crispy' feel that some brands do.
Thanks for staying with me till the end of the post. I know it has been a very long post(but it's a detailed post about my 6 hours long trip that has been condensed into a 5 minute read). I hope my story has contributed to your own research on hairsalons and hairstyles that you might want to try out in the future. For those looking to try out 99 Percent Hair Studio, I highly recommend Fion ^^(but do book an appointment before you go, since they can be really busy). So what do you think about my hair? Do you like curls or straight hair? Feel free to comment or tweet me (@yangel0130)!

Till next time,
Love,
El   xoxo


Related Posts Plugin for WordPress, Blogger...