cookieChoices = {}
Image Map
Showing posts with label Gifts. Show all posts

Friday, 20 December 2013

Christmas Gift Ideas: DIY Christmas Cards (Part 3)

Hello lovely people!

Welcome back to the last part of our Christmas DIY cards series! Today's card is SUPER EASY and fast to do. I'm going to show you my print out cards that I designed and created using the tools on Picmonkey and Microsoft Office. I'm usually more of a cut and glue person when it comes to cards, but one can't deny the convenience and ease of print out cards. Thus I'm going to share the print out cards files with you here. You can also customize how the cards look like even after they are printed out, such as adding a photo inside or adding on little decos. I'll show you how I did my cards and  customized them so they don't look run-off-the-mill.


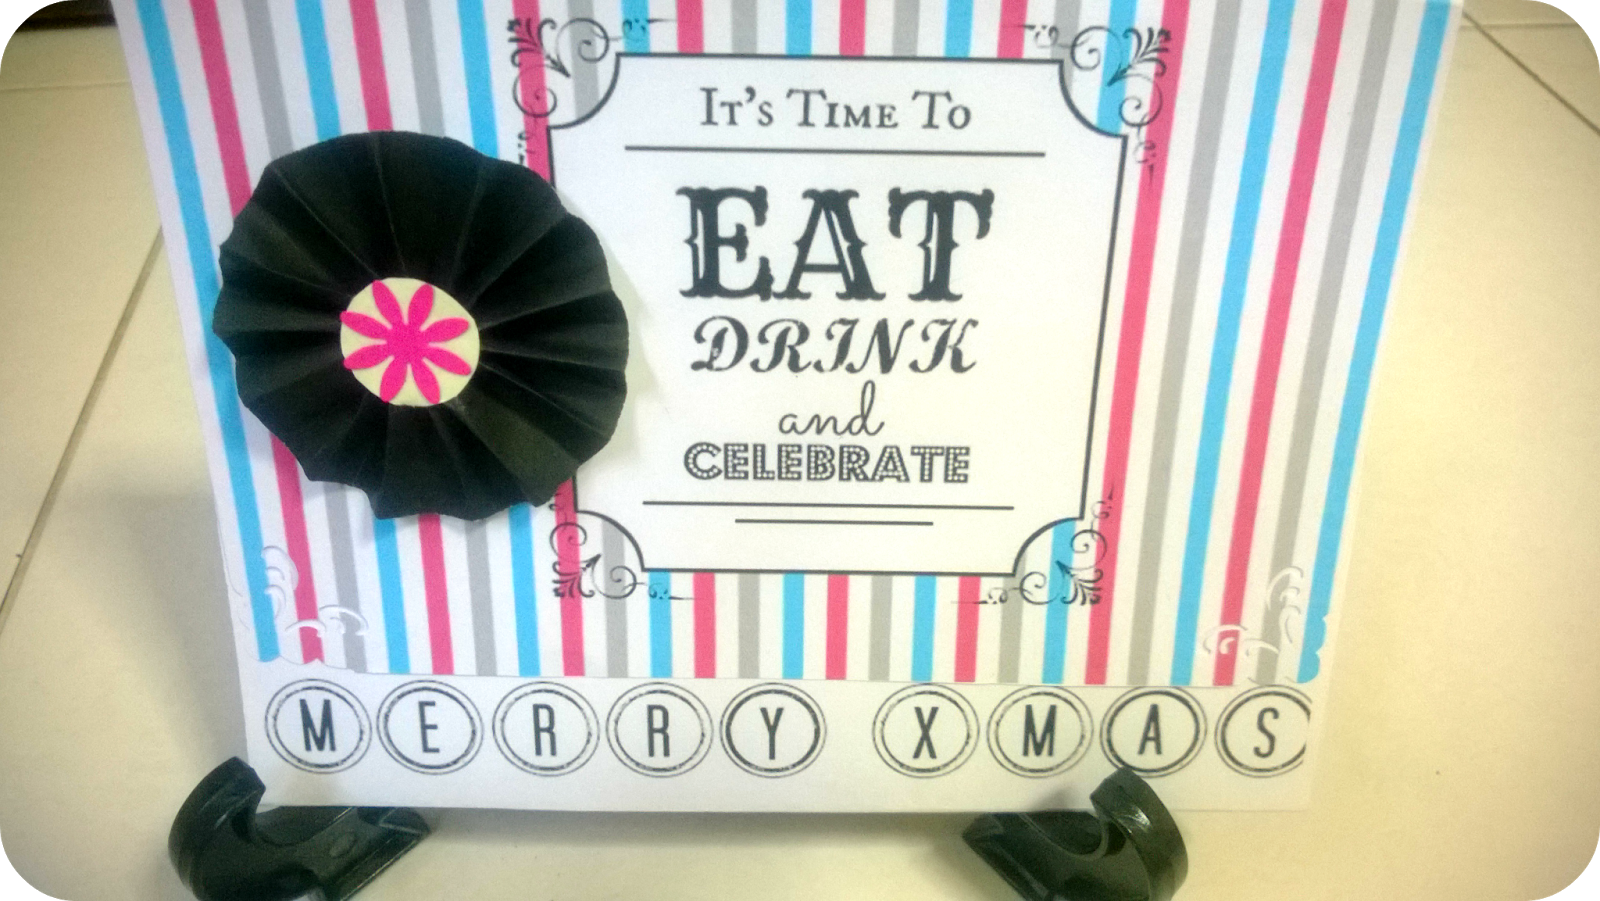
The 3 card designs available: (from left to right) Card 1, Card 2(stripes card) and Card 3(words card).
  • First off, download the files.(Files are in PDF format)

First card:Click here
Second card:Click here
Third card:Click here
  • Print the card on a piece of white A4 size paper. For the third card, you can use other coloured paper as well since it is in black and white.
  • Cut away the excess paper marked out by the vertical line.

  • Use a creasing tool to mark out the lines that you have to fold. These lines are indicated by the dotted lines. 
  • Fold both the left and right side of the cards inwards to get something that looks like the card in the picture below  
  • Write a message inside the card or add a photo. Decorate the card as you wish, both outside and inside.
  • To decorate, you can tie a ribbon around the card as seen in Card 1 or make a flower like in Card 2.
How to make the paper flower:(refer to pictures for visual help)
1: Cut a strip of paper around 15 cm long. The width of the strip will be the radius of the flower.
2: Fold like how you would fold a fan. 
3:Make a circle with the strip and glue the ends together. Glue on a circle or flower shaped paper in the centre.

Here are pictures of the cards:

Card 1: A snowflakes card that looks really cute and cheerful with the scalloped edge. I added a pink ribbon to make it more girly.
Card 2:  A card that reminds me of a carnival due to the colourful striped background (it's the same as our blog's bg).
Card 3: A simple monochrome card that uses text for decoration. Suitable for both genders and gives off a mature but fun vibe.

Well I hope you do take a shot at making these cards this Christmas. It'll make a great gift by itself or as an add-on besides the Christmas gift you're giving! I hope enjoyed our DIY Christmas Cards series for this year. Here's to wishing you a good Christmas filled with fun and food. 

Here're the 3 cards again after I was done with all the decorations! Don't they look pretty?


Till next time.
Love,
El   xoxo


Wednesday, 18 December 2013

Christmas Gift Ideas: DIY Christmas Cards (Part 2)

Hello lovely people!

Welcome back to Part 2 of our Christmas DIY cards series. Today's card is for all those Whovians out there as we're making a TARDIS card! This will be a super awesome gift for those Dr Who fans anytime of the year. A TARDIS card will make a special gift since this year, since not only is this year the 50th year since the show has aired, but also because there's going to be a new Doctor this Christmas! Hands up if you're excited to catch this year's Christmas special.

I'm going to show you how to make a TARDIS card in 2 different ways. First one will be the easy card, which just involves printing, cutting and gluing everything together. The second one requires more effort, but it definitely is cooler. I actually made this card for my friend's birthday earlier this year and she loved it. Sorry that there's no final completed picture for this because Christine didn't help me take a photo of it after she finished gluing the parts together. Anyway, let's ditch the rambling and get started :)

TARDIS Card: The Easy One 
Materials:
  • A piece of blue paper (TARDIS blue)
  • TARDIS stencil (click on link below)
  • scissors
  • glue
  • ruler
  • writing materials
Steps

  1. Draw out your own TARDIS if you can. You can access my TARDIS picture with the measurements by clicking on this link.  Well, I did this part, so I've scanned the finished version and uploaded it. You can get it here. (NOTE: You have to use a paper that is not too thick or else your printer is unable to print it. I learnt this the hard way when my printer got jammed *cries*)
  2. Click on link and open file. Print it on blue paper and cut the outline. 
  3. Open the file for the TARDIS add ons (like the windows etc) and print them. The add ons like the windows and 'Pull to Open' poster have been sized to the scanned drawing, so if you printed the TARDIS drawing in original size, everything should fit nicely. Cut them and print them. Don't worry if you screw up the cutting since I made extras for such purpose. 
  4. For the window panes, I made small white rectangles because I used them as stencils to draw on black paper and cut them out. If you're lazy, just make the rectangles black, print and cut them out. 
  5. Glue the add ons to the TARDIS as shown in the picture. Download the TARDIS add on document here. The respective places have been marked out so you just paste accordingly. You can choose to write a X'mas message behind or add on anything else to make the card look more festive :)
  6. And now you've got your very own TARDIS card!

Tadah! A simple TARDIS card is formed!

TARDIS Card: The Difficult One


This is how it should look like in the end. Notice that you get to open the doors! 

Materials:
  • 2 pieces of the same blue paper and other coloured paper
  • glue
  • scissors
  • clips or stapler
  • ruler
  • writing materials
Steps
  1.  Same as the easy version. Print the drawing outline by clicking on the link here. Use your blue paper or rough paper if you're going to be doing step 2. If you can print it on your paper, then skip to step 4. I advise you to make 2 copies of the TARDIS if you're printing. You'll need one copy to be the base TARDIS and the other for the doors.
  2. Now this is the important part if you're using a thick paper that your printer rejects(aka it's too thick to print). You take the printed paper and attach it to your desired TARDIS paper using stapler/glue/clips. The printed TARDIS picture will act as the outline for you to cut along. Cut carefully!
    You should get something like this. Notice there aren't any lines on it.
  3. Now, take a pencil and ruler and draw back the lines on the TARDIS based on what you see on the printed version. Don't need to draw the doors part because we'll be making the doors. Take a black ink pen/marker and draw over the pencil lines. This will be your base TARDIS.
  4. Alright now for the doors part. For those who did the printing method for the TARDIS, this is where you continue reading. You should have 2 TARDIS printed out. Take one of it and cut away the parts that are not the doors as shown by the black dotted lines in the picture. Cut the doors in half to separate them. You should end up with a door for each side of the TARDIS.  Fold along the white dotted lines as marked in the picture to make the tabs. 
  5. For those who did the cut and draw in the lines method, measure the TARDIS doors and draw them on another piece of TARDIS blue paper. If you're lazy, take the TARDIS that you printed to act as a stencil and cut out the doors portion. Use that as a stencil to draw the doors. Add a 1cm tab along the sides of both doors so you can fold and glue to the base TARDIS.  For this step, you still have to draw in details on the doors.
  6. Print the TARDIS add ons and cut them out. Download the add ons from this link. Glue them to the respective places.
  7. Glue the tab part of the doors to the base TARDIS. Now you have a TARDIS card with doors that can be opened and closed! For the inside of the TARDIS, you have to cover the lines with a picture or a paper. You can print a picture of the inside of the TARDIS and scale it to the right measurements and then paste it. Or you can take a nice piece of paper and cut it down to size and paste it there to cover the lines. Then take a pen and write a lovely, heartfelt message on it. 
This should be more or less how your final TARDIS should look like. I've not glued in the window panes for this.
Final notes:
In case you've missed out on the available resources, here's the round up.
Picture of TARDIS for printing:here
TARDIS add ons:here
Picture of TARDIS with measurements:here

That's all the steps needed to make a TARDIS card. Now make one and surprise a Dr Who fan. If you're unfamiliar with how the TARDIS looks like, Google images and note down the details. I hope you enjoy making this card! Check back again tomorrow for the final segment of our DIY Christmas Cards series!

Till next time
Love,
El   xoxo


Tuesday, 17 December 2013

Another New Look for Christmas!

Hey lovely people!

What do you think of the blog's new look? I finally got some time on hand to revamp the blog, as well as attempt to make the blog look better. Since Christmas is coming very soon, I thought I might as well use the traditional Christmas colours of red and green for the blog. Instead of using bright red+green colours, I used the milky/pastel versions of red+green to tone the colours down. I like it this way since the colours will look more "girly" and less in your face. I've been reading up more on HTML and other tips to customise the blog, so expect more changes to the blog's look in the future! Hopefully I get better and more resourceful at doing this kind of things with time, because all the coding is like rocket science to me. Don't be surprised if the blog's appearance keeps changing in the meantime whilst I fiddle with a couple of details.

Since we're on the topic of Christmas, how're your preparations for Christmas? I've been doing Christmas shopping for myself and for others. There are just simply so many sales going on! I've been to The Body Shop lots for skincare stuff and also Metro and Watsons to check out the makeup. If you're still stumped over what to get for Christmas, check out our recent Christmas shopping guides! They just might help you get started thinking on ideal gifts for your loved ones. For those who are broke, check back here tomorrow for our DIY Christmas cards! They're pretty+easy+cheap to make, and handmade cards are always wonderful gifts.

Well I hope this December has been great for you so far, and will continue to be even better. Have a goodnight and check back here tomorrow!

Till next time.
Love,
El   xoxo

Sunday, 15 December 2013

Christmas Gift Ideas: Christmas Shopping Guide (Part 2)

Welcome back to the shopping guide!
- The "Upgrade" Version -

X'mas will be upon us in a few weeks' time!!
i.e. X'mas sales!
And deals :)

For those who have more cash to burn, this post will certainly help you get rid of those extra money.
That said, these are still definitely value for money.

Read on for a list of places to get gifts for her and him!

~~

1. LUSH - Fresh Handmade Cosmetics

Personally, I have never owned nor used any lush products. In fact, my allergies acted up the very first time I stepped into the store. The smells, to say the least, are certainly very strong.

Hailing from UK, they are, undoubtedly, most known for their au naturel handmade products.
At minimum $10.50 per 100g of soap, it is high up on my list of "Most Expensive Soap Ever."
 But that's not to say LUSH is not awesome! It is, indeed, very awesome.
From facial masks to soap to perfume, they have what you need to make that gift just that tad extra special for that special someone.

Lush has a men's range too!
So don't feel like you're leaving him out.
If nothing, get the facial masks! He will thank you for his new found baby skin.

If really nothing else, check out the X'mas range.
I'm highly intrigued by Snowcake.

What I would buy for her: Henna hair dye, Mask of Magnaminty, Snow Fairy
What I would buy for him: Mask of Magnaminty, Dirty Shaving Cream, Toothy Tabs

Click here for their online store.
Brick and mortar stores: Wisma Atrium, Suntec City Mall.


2.  MONOYONO - Anything But Ordinary

For quirky and fun gifts, look no further.
Just as it's tagline states, all the items are "anything but ordinary".

From sticky notes rollers to moustache cookie cutters to poo-pourri bathroom sprays, Monoyono is definitely not your average store.

For those with 'tongue-in-cheek' friends, this is definitely a to-go place to check out for x'mas gifts!

What I would buy for her: Poo-pourri, Pumped Up phone stand, Roller Notes
What I would buy for him: Poo-pourri, Beat Bot, a Mug.

Yes, I did write POOPOURRI. Watch this to be mind-blown. No more stink! :O


Click here for their online store. 
Brick and mortar stores: Plaza Singapura, VivoCity, Raffles City.

3. Sephora

Now, THIS is a haven for her and for him.
There are a lot, I repeat, A LOT of gifts to find here.
But more for her.

Just recently, Urban Decay launched Naked Palette 3 - rose gold edition.
So yes, if you are feeling generous this year, why not consider this lovely new eye palette?
(Though beware that it is rumoured to have quite a fair bit of fall out)

The different in-store brands also have X'mas deals for sale.
I chanced upon this while I was whiling time away recently.


For $36, this STILA lip glaze set, Colour Me Glossy, contains 9 different ones.
It costs $31 for one usually. Do the math.
It makes a good gift to someone who's a lipgloss fanatic!

For him, there are the hair and body products.
And cologne.
If you're at a lost, there's always the friendly staff to help you out.

What I would buy for her: Naked Basics, Stila Lipglaze set, gift vouchers (don't be stingy!)
What I would buy for him: Gift Vouchers. (Best to let him decide what he likes)

Click here to go to their online store
Brick and Mortar store: Ngee Ann City, Marina Bay Sands, Plaza Singapura, Ion Orchard, Vivocity, Jem, Great World City, Bugis+, Suntec City Mall.


4. The Body Shop

This is the place to go for all those value-for-money X'mas gift sets.
They are all packaged prettily too!
Starting from as low as $5.90 for a X'mas nail file to $65.90 for a X'mas limited edition body set, there is something for everyone, him or her.

Also, they are having a buy 2 get 1 free offer now.
Whatcha waitin' fer?

(A cheaper alternative to Lush) This is the best fall-back place to get X'mas gifts.


Check out their online store here:
Brick and Mortar store: A LOT


5. Sasa

Sasa has a lot to offer this X'mas season too.
Sasa's in-house brand, Sasatinnie, is having a BOGO deal for their eye shadows and lip range.
Colour pay off is pretty good, although if the receiver is not a big fan of shimmers, you'd do well to skip this.

Also, almost all make-up ranges have up to 20% discount, if I'm not wrong.
This includes TheBalm.
Any make-up fanatic will know about Meet Matt(e), Bahama Mama and Frat Boy.
Now is a good time to buy them, for yourself or for that one friend who's crazy about make-up.

Perfumes and fragrances are on discount too!
They have up to 30% off which I think it's a decent discount for such items.
They have those set of 5 travel-size perfumes, or similar sets, for certain brands.
I saw one from Lanvin. The packaging is pretty cute and sturdy.

Be sure to head down to the nearest Sasa and check out their offers!

What I would buy for her: Meet Matt(e) Nude, Sasatinnie's Beloved eyeshadow palette, Facial masks.
What I would buy for him: Hmm, this is tough. Perhaps facial masks? Or hair gel. Hah. For him.

Find them online here.
Brick and mortar stores: EVERYWHERE. Almost.


6. Kinokuniya

Books are always a wonderful gift to receive.
Knowledge is power after all.
From now till 23rd dec, you get 20% off all purchases if you're a member.
Pretty good deal considering one year's membership is at $21.40.

Here are some authors to consider: Neil Gaiman, John Green and Mitch Albom.
If you're into dark humor, you will love Cyanide & Happiness and Ice Cream & Sadness.
For the poetry lover, why not gift them Sylvia Plath's The Collected Poems?
Or give aspiring polyglots some language books.
Cookbooks are aplenty too for the chefs-to-be.

With more than 500000 books, you are so spoilt for choice.

Check their online store here.
Brick and mortar stores: Ngee Ann City, Liang Court, Bugis Junction, Jem


~~

Have fun shopping X'mas! :D
Don't forget to pamper yourself too.
<3

Till next time.
Love,
Christine xoxo
Related Posts Plugin for WordPress, Blogger...